요약
표지판을 디자인한 후 표지판 배치 알고리즘 작성하였다. 표지판을 배치하기 위해 해당 공간을 사용할 수 있는지, 어떤 표지판을 배치하는지 판단하기 위해 CheckAndPlaceSelection()을 만들었지만 매개변수가 많아 간략화한 오버 로딩 함수를 작성하였다. 이를 통해 각 스킬의 배치 알고리즘을 작성하였다. 추가로 스킬을 사용횟수를 제한하는 함수를 통해 스킬을 제거할 수 있다.
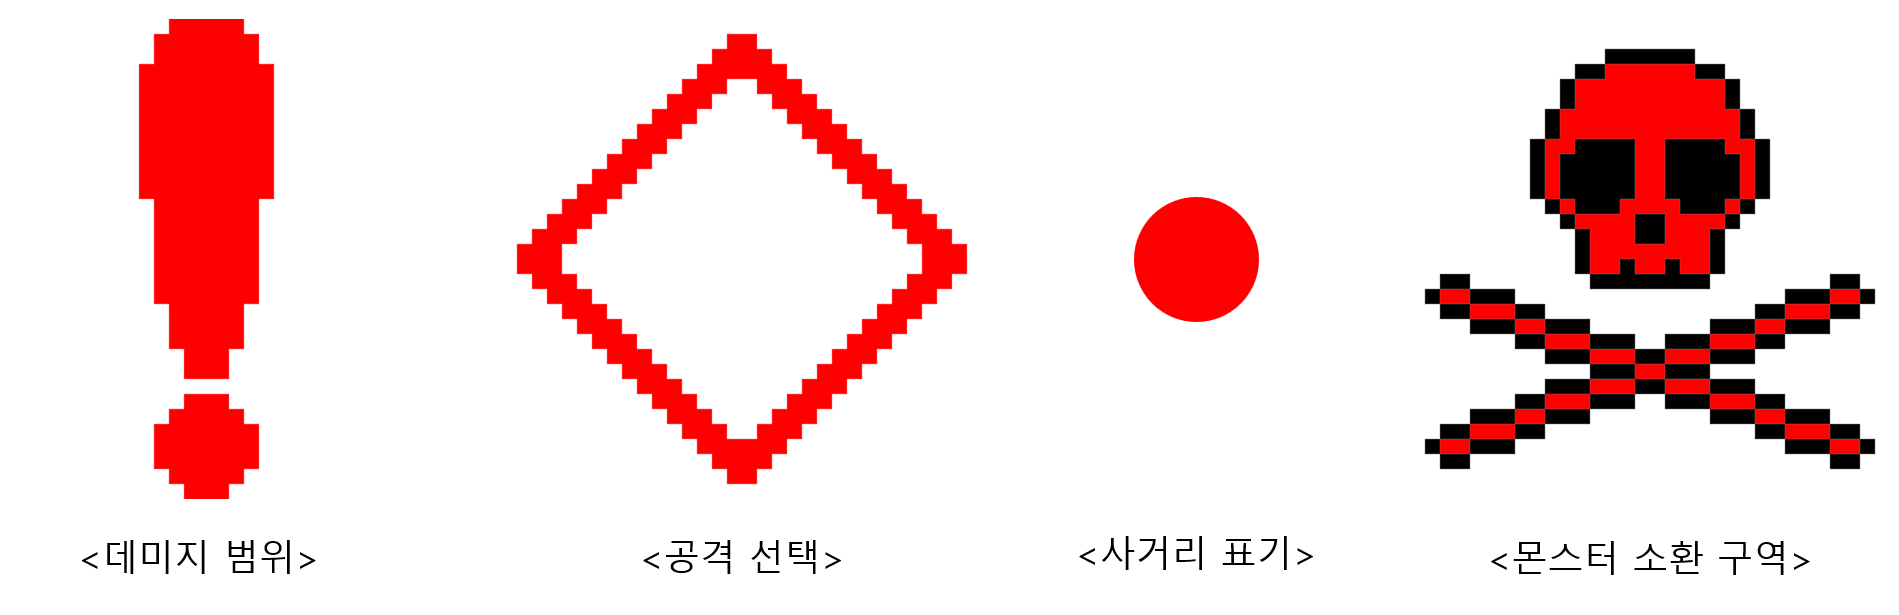
표지판 디자인
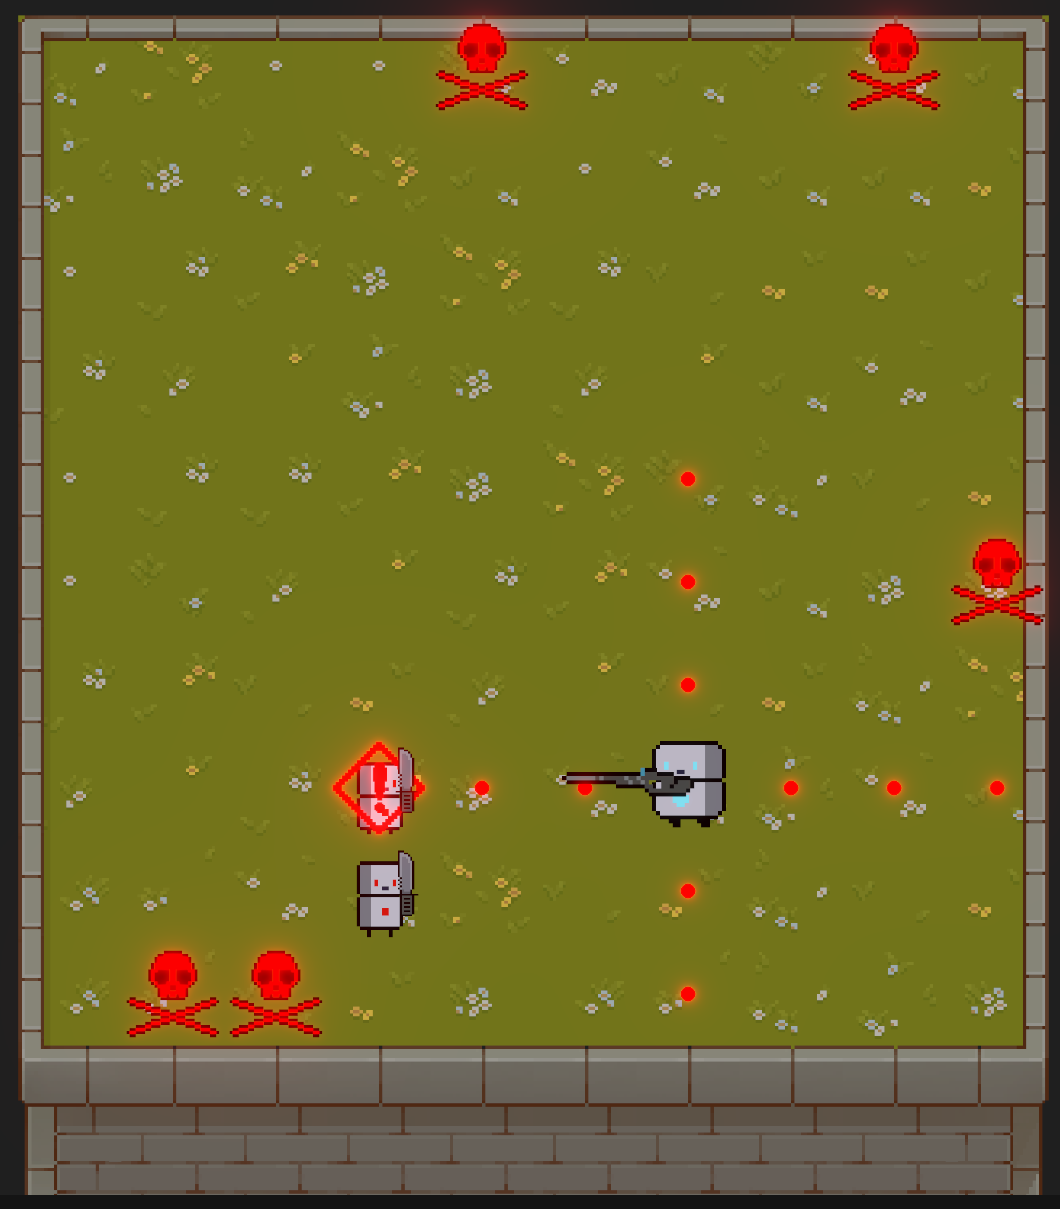
*몬스터 소환 구역은 추후 글 작성예정
표지판 배치 알고리즘
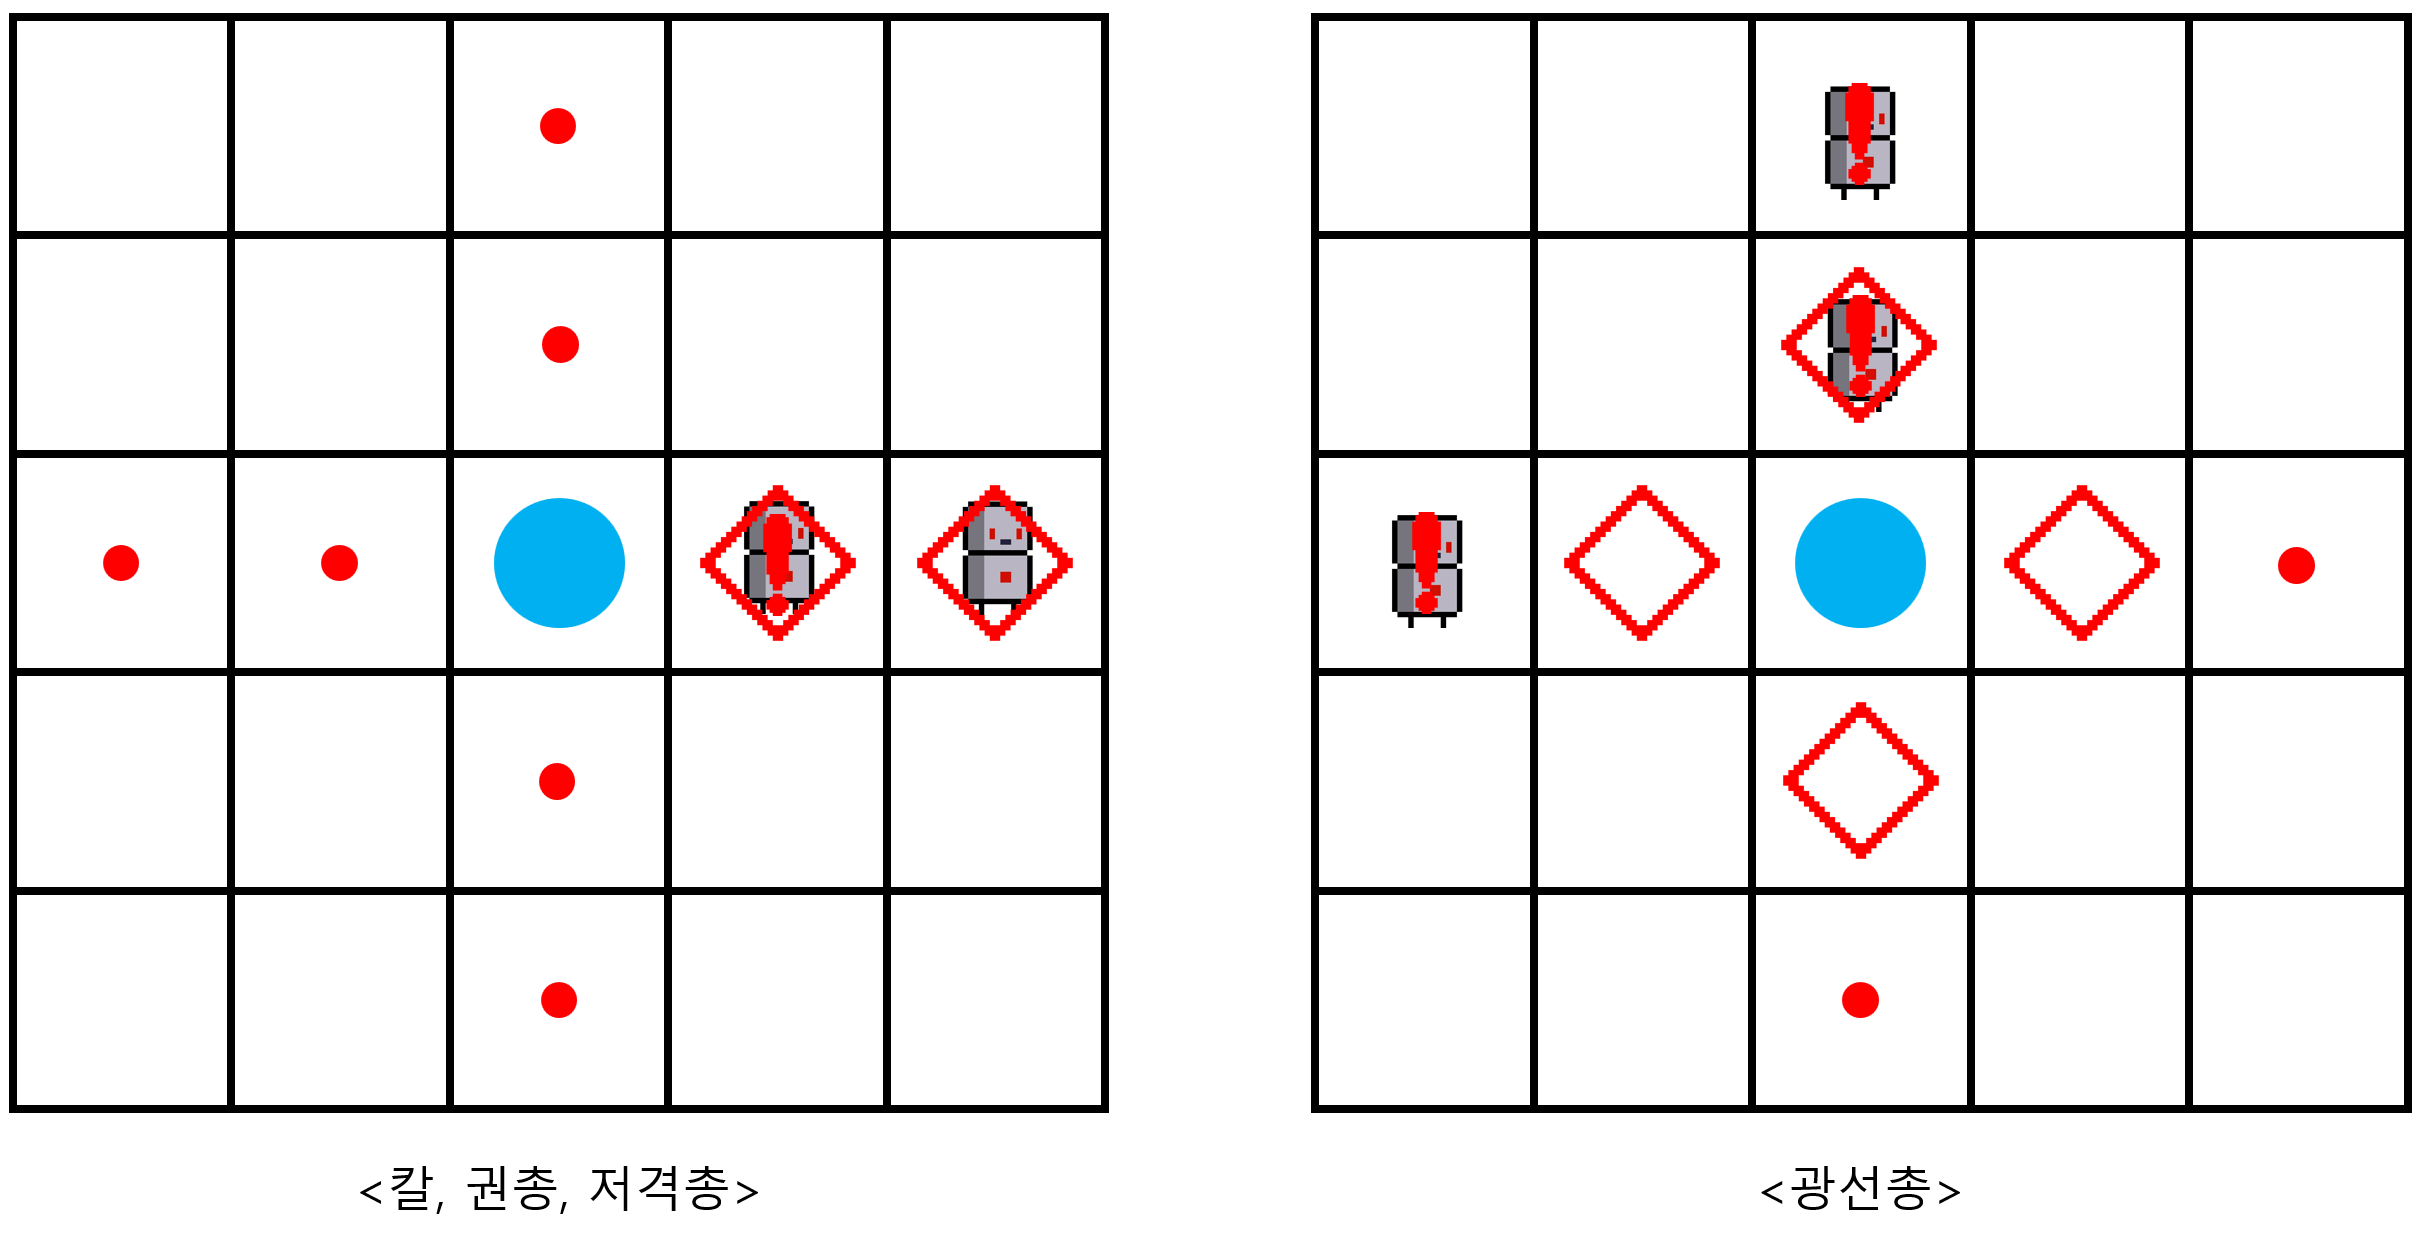

칼, 권총, 저격총: 사거리 표기를 통해 사거리를 알린 후 공격 선택을 통해 위치를 선택하면 가장 앞의 몬스터를 공격
산탄총: 공격 선택을 통해 위치를 선택하면 좌우 혹은 상하에 피해를 줌
광선총: 상하좌우 중 한 곳을 선택하면 그곳을 기준으로 맵 끝까지 피해를 줌
표지판 배치 코드
표지판 배치를 하기 위해 배치 공간에 경우에 따라 배치할 표지판 종류를 고르는 함수를 작성하였다.
Skill.cs
public class Skill : MonoBehaviour
{
    ... 생략 ...
    // 물체가 앞에 있어 막히는 경우 사용
    private bool CheckAndPlaceSelection(bool condition, int x, int y, bool isDamagedArea, bool isSelection = true)
    {
        if (condition)
        {
            if (Instance.Map2D[x, y] == (int)MapObject.moster)
            {
                if (isDamagedArea)
                {
                    PlaceSelection(x, y, PoolManager.Prefabs.DamagedArea);
                }
                if (isSelection)
                {
                    PlaceSelection(x, y, PoolManager.Prefabs.Selection);
                }
                return false;
            }
            else
            {
                PlaceSelection(x, y, PoolManager.Prefabs.UnSelection);
            }
        }
        return true;
    }
CheckAndPlaceSelection()의 매개변수는 배치할 수 있는 공간인지, 공간 좌표 x, y, 데미지 공간 인지, 선택 공간 인지 선택을 할 수 있다. 그러나 이는 매개변수가 많다고 생각해 오버 로딩하여 다음과 같은 함수를 만들었다.
    // 직선 범위공격시
    private void CheckAndPlaceSelection(bool condition, int x, int y, int index)
    {
        if (condition)
        {
            if (index == 1)
            {
                if (Instance.Map2D[x, y] == (int)MapObject.moster)
                {
                    PlaceSelection(x, y, PoolManager.Prefabs.DamagedArea);
                }
                PlaceSelection(x, y, PoolManager.Prefabs.Selection);
            }
            else if(Instance.Map2D[x, y] == (int)MapObject.moster)
            {
                PlaceSelection(x, y, PoolManager.Prefabs.DamagedArea);
            }
            else
            {
                PlaceSelection(x, y, PoolManager.Prefabs.UnSelection);
            }
        }
    }

    private void PlaceSelection(int x, int y, PoolManager.Prefabs prefabType)
    {
        Instance.poolManager.SelectPool(prefabType).Get().transform.position = new Vector3(x, y, -1);
    }
}
CheckAndPlaceSelection()을 오버 로딩한 매개변수는 배치할 수 있는 공간인지, 공간 좌표 x, y, 플레이어 근처인지(index == 1) 와 같은 선택을 할 수 있다.
PlaceSelection()는 그저 오브젝트를 소환할 때 좌표 지정을 편리하게 하려고 만들었다.
배치 공간 판단
표지판 배치 코드는 알고리즘을 보면 3가지로 분류하여 작성할 수 있다. 이를 위해 AttackType을 열거형으로 3가지의 종류를 만들고 그에 따른 알고리즘을 작성하였다.
Skill.cs
public class Skill : MonoBehaviour
{
    public enum AttackType
    {
        Normal,
        Schrotflinte,
        LaserGun
    }
    ... 생략 ...
    public void UnifiedAttackRange(int size, AttackType attackType, Vector3Int targetPos = new Vector3Int(), Vector2Int startPos = new Vector2Int(), Vector2Int endPos = new Vector2Int())
    {
        targetPos = Instance.PlayerPositionInt;
        startPos = Vector2Int.zero;
        endPos = new Vector2Int(Instance.MapSizeX - 1, Instance.MapSizeY - 1);

        bool downSide = targetPos.y > startPos.y;
        bool upSide = targetPos.y < endPos.y;
        bool leftSide = targetPos.x > startPos.x;
        bool rightSide = targetPos.x < endPos.x;

        // Up, Down, Left, Right
        bool[] isDamagedArea = new bool[4] { true, true, true, true };
        for (int index = 1; index <= size; index++)
        {
            int downPos = targetPos.y - index;
            int upPos = targetPos.y + index;
            int leftPos = targetPos.x - index;
            int rightPos = targetPos.x + index;

            bool downPosSide = downPos > startPos.y && downPos < endPos.y;
            bool upPosSide = upPos > startPos.y && upPos < endPos.y;
            bool leftPosSide = leftPos > startPos.x && leftPos < endPos.x;
            bool rightPosSide = rightPos > startPos.x && rightPos < endPos.x;
up, down, left, rightSide: 주어진 위치가 맵 안인지 확인하기 위한 변수
up, down, left, rightPos: 주어진 위치의 상하좌우의 값을 저장하기 위한 변수
up, down, left, rightPosSide: 주어진 위치의 상하좌우가 맵 안인지 확인하기 위한 변수
isDamagedArea[]: 칼, 권총, 저격총이 앞에서 데미지가 들어갔다는 것을 확인하기 위한 배열
위 변수들을 통해 배치할 수 있는 공간인지 판단한다.
switch (attackType)
{
    case AttackType.Normal:
        {
            if (isDamagedArea[0])
            {
                isDamagedArea[0] = CheckAndPlaceSelection(upPosSide && leftSide && rightSide, targetPos.x, upPos, isDamagedArea[0]);
            }
            else
            {
                CheckAndPlaceSelection(upPosSide && leftSide && rightSide, targetPos.x, upPos, isDamagedArea[0]);
            }
            if (isDamagedArea[1])
            {
                isDamagedArea[1] = CheckAndPlaceSelection(downPosSide && leftSide && rightSide, targetPos.x, downPos, isDamagedArea[1]);
            }
            else
            {
                CheckAndPlaceSelection(downPosSide && leftSide && rightSide, targetPos.x, downPos, isDamagedArea[1]);
            }
            if (isDamagedArea[2])
            {
                isDamagedArea[2] = CheckAndPlaceSelection(leftPosSide && upSide && downSide, leftPos, targetPos.y, isDamagedArea[2]);
            }
            else
            {
                CheckAndPlaceSelection(leftPosSide && upSide && downSide, leftPos, targetPos.y, isDamagedArea[2]);
            }
            if (isDamagedArea[3])
            {
                isDamagedArea[3] = CheckAndPlaceSelection(rightPosSide && upSide && downSide, rightPos, targetPos.y, isDamagedArea[3]);
            }
            else
            {
                CheckAndPlaceSelection(rightPosSide && upSide && downSide, rightPos, targetPos.y, isDamagedArea[3]);
            }
            break;
        }
칼, 권총, 저격총이 사용하는 알고리즘으로 상하좌우에 공격 범위 만큼 배치 할 수 있다. 특이한 점은 isDamagedArea[]을 통해 미리 앞에 판정이 들어가면 뒤에는 데미지 범위 판정이 안되도록 하였다.
case AttackType.LaserGun:
    {
        CheckAndPlaceSelection(upPosSide && leftSide && rightSide, targetPos.x, upPos, index);
        CheckAndPlaceSelection(downPosSide && leftSide && rightSide, targetPos.x, downPos, index);
        CheckAndPlaceSelection(leftPosSide && upSide && downSide, leftPos, targetPos.y, index);
        CheckAndPlaceSelection(rightPosSide && upSide && downSide, rightPos, targetPos.y, index);
        break;
    }
광선총은 사용하면 단순히 플레이어 주위만 공격 선택 표지판을 배치하고 나머지는 사거리 표기랑 공격 범위 표기를 하도록 하였다.
case AttackType.Schrotflinte:
    {
        CheckAndPlaceSelection(upPosSide && leftSide && rightSide, targetPos.x, upPos, index);
        CheckAndPlaceSelection(downPosSide && leftSide && rightSide, targetPos.x, downPos, index);
        CheckAndPlaceSelection(leftPosSide && upSide && downSide, leftPos, targetPos.y, index);
        CheckAndPlaceSelection(rightPosSide && upSide && downSide, rightPos, targetPos.y, index);

        CheckAndPlaceSelection(leftPosSide && targetPos.y + 1 < endPos.y && downSide, leftPos, targetPos.y + 1, true, false);

        CheckAndPlaceSelection(leftPosSide && upSide && targetPos.y - 1 > startPos.y, leftPos, targetPos.y - 1, true, false);

        CheckAndPlaceSelection(rightPosSide && targetPos.y + 1 < endPos.y && downSide, rightPos, targetPos.y + 1, true, false);

        CheckAndPlaceSelection(rightPosSide && upSide && targetPos.y - 1 > startPos.y, rightPos, targetPos.y - 1, true, false);

        break;
    }
default:
    break;
... 생략 ...
산탄총은 특이하게도 UnifiedAttackRange()를 오버 로딩된 것과 혼용하여 사용해야 한다. 특히 대각선에도 공격 범위가 해당하므로 판정 또한 상하좌우로 하였다.
스킬 사용 횟수 확인
public void CheckUsage()
{
    if(Usage >= UsageLimit)
    {
        transform.parent = null;
        if(myObject.transform.localScale.x < 0)
        {
            myObject.transform.localScale = new Vector3(-myObject.transform.localScale.x, myObject.transform.localScale.y, 0);
        }
        myObject.transform.rotation = Quaternion.Euler(Vector3Int.zero);
        Usage = 0;
        myObject.Destroy();
    }
}
실제로 스킬이 사용된 횟수를 판단하고 지정된 제한 횟수를 지나면 파괴되도록 설정되어 있다. 파괴될 때는 재사용 되기 위해 Pool Manager로 돌아감으로 부모 오브젝트를 Null로 하여 재사용에 문제가 없도록 하였다.
'Unity > 로봇 체스 개발 일지' 카테고리의 다른 글
| [Unity] 스킬 구현(3) : 광선총 발사 알고리즘 (0) | 2025.01.14 |
|---|---|
| [Unity] 스킬 구현(2) : 데미지 판정, 스킬 알고리즘 (0) | 2025.01.13 |
| [Unity] 로봇 상태 관리(2) : Player, PlayerStateMachine 구현 (0) | 2025.01.12 |
| [Unity] 로봇 상태 관리(1) : Monster, MonsterStateMachine 구현 (0) | 2025.01.12 |
| [Unity] 로봇 움직임 구현(3) : MonsterMovement 몬스터 동작 알고리즘 (0) | 2025.01.12 |
